Watering Plants with a Raspberry Pi
March 28, 2020 | 15 minutesIn This Post
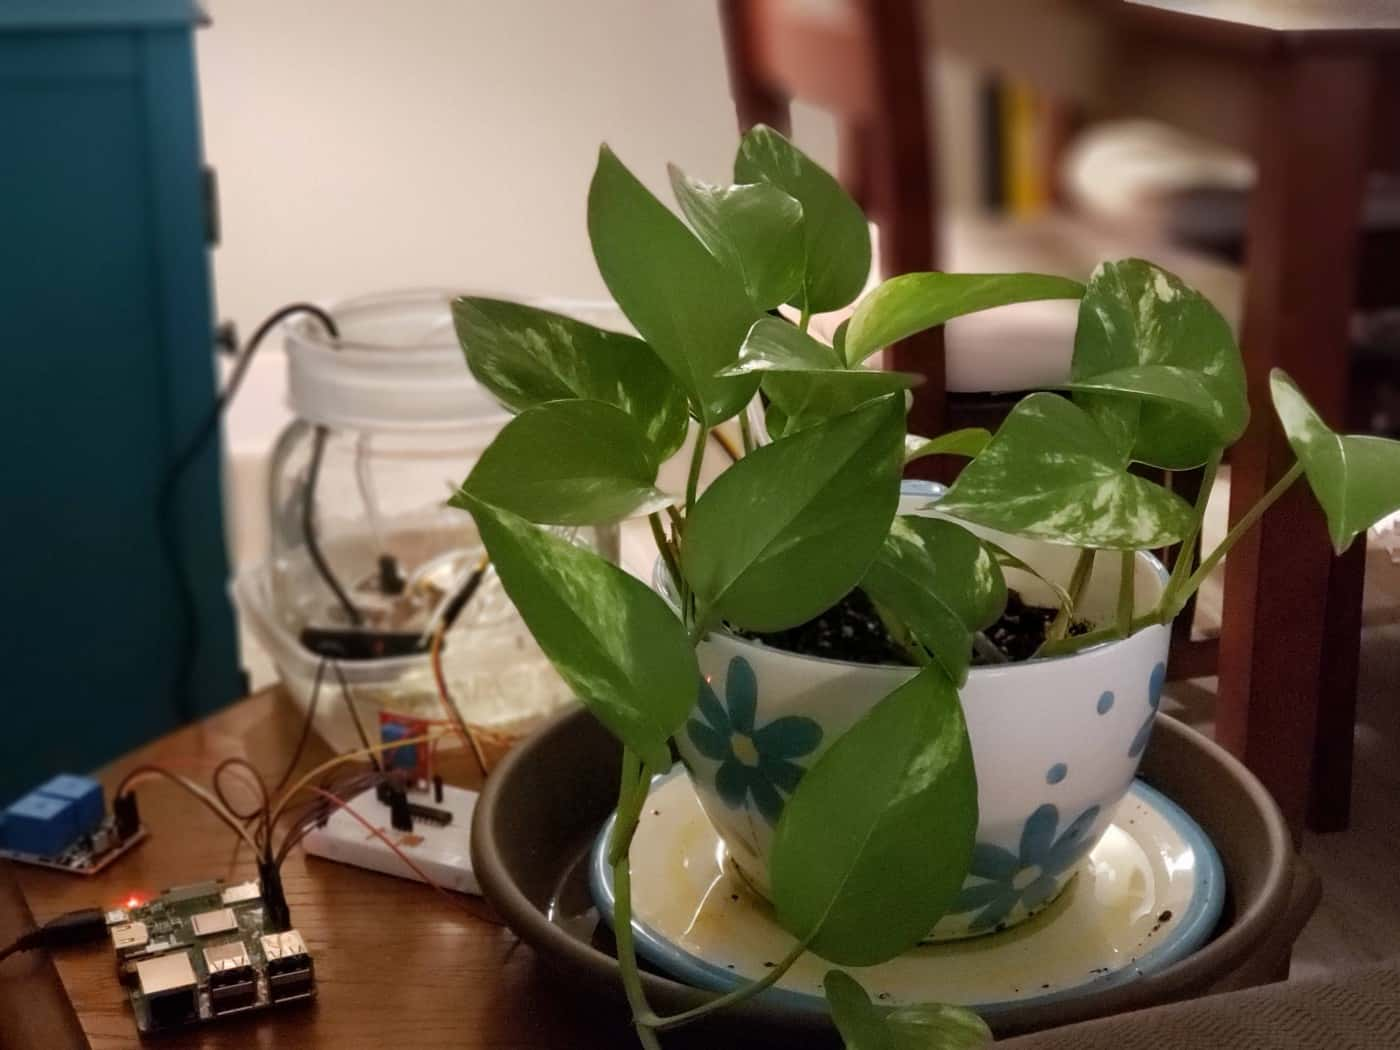
As a software engineer who loves gardening and also enjoys creating Internet of Things (IoT) projects, I recently decided to program a Raspberry Pi to automatically water one of my plants. Here’s how I did it.
Getting Started
To make this project, you’ll need the following items. Disclosure: I get commissions for purchases made through links in this post.
- 1 Raspberry Pi
- 1 small breadboard
- 1 MCP3008 analog to digital converter - If you use a digital moisture sensor, you don’t need this)
- 1 moisture sensor — I recommend using a capacitive version*
- 1 5V relay module
- 1 5V power supply
- 1 3V-6V submersible water pump
- 1 jar for water source — I found that a wide mouth Ball Canning Jar works well
- 1 SD Card (for the Raspberry Pi operating system)
- Fish tank tube
- Female-to-female jumper cables
- Male-to-male jumper cables
- Male-to-female jumper cables
Note: The links to the items above are not meant to be an endorsement; they’re suggested parts and are also meant to provide clarity around the parts that I used.
*Resistive vs. Capacitive Soil Moisture Sensors I originally created my automated plant waterer using a resistive soil moisture sensor. These sensors are generally coated with a finish meant to protect them from corrosion, but in my experience, they still corrode over time anyway, often lasting only a few months. The capacitive sensors are longer lasting because they’re made from more corrosion resistant materials.
Programming Language Many of the Raspberry Pi projects that I’ve seen online use Python, but since I’m a JavaScript developer, I used Node.js to create the script that runs on the Raspberry Pi to handle watering the plant.
In addition, I used the following JavaScript libraries, which are all available on npm:
- mcp-spi-adc — for reading from the MCP3008 chip
- node-schedule — for scheduling recurring task
- onoff — for accessing the sensors/GPIO
The script for the project can be found on Github: https://gist.github.com/rdeprey/6395b808c9b72213d8a3f298a63efaca.
Preparing the Raspberry Pi
The Raspberry Pi website has a great getting started guide: https://projects.raspberrypi.org/en/projects/raspberry-pi-getting-started.
Wiring Up the Components
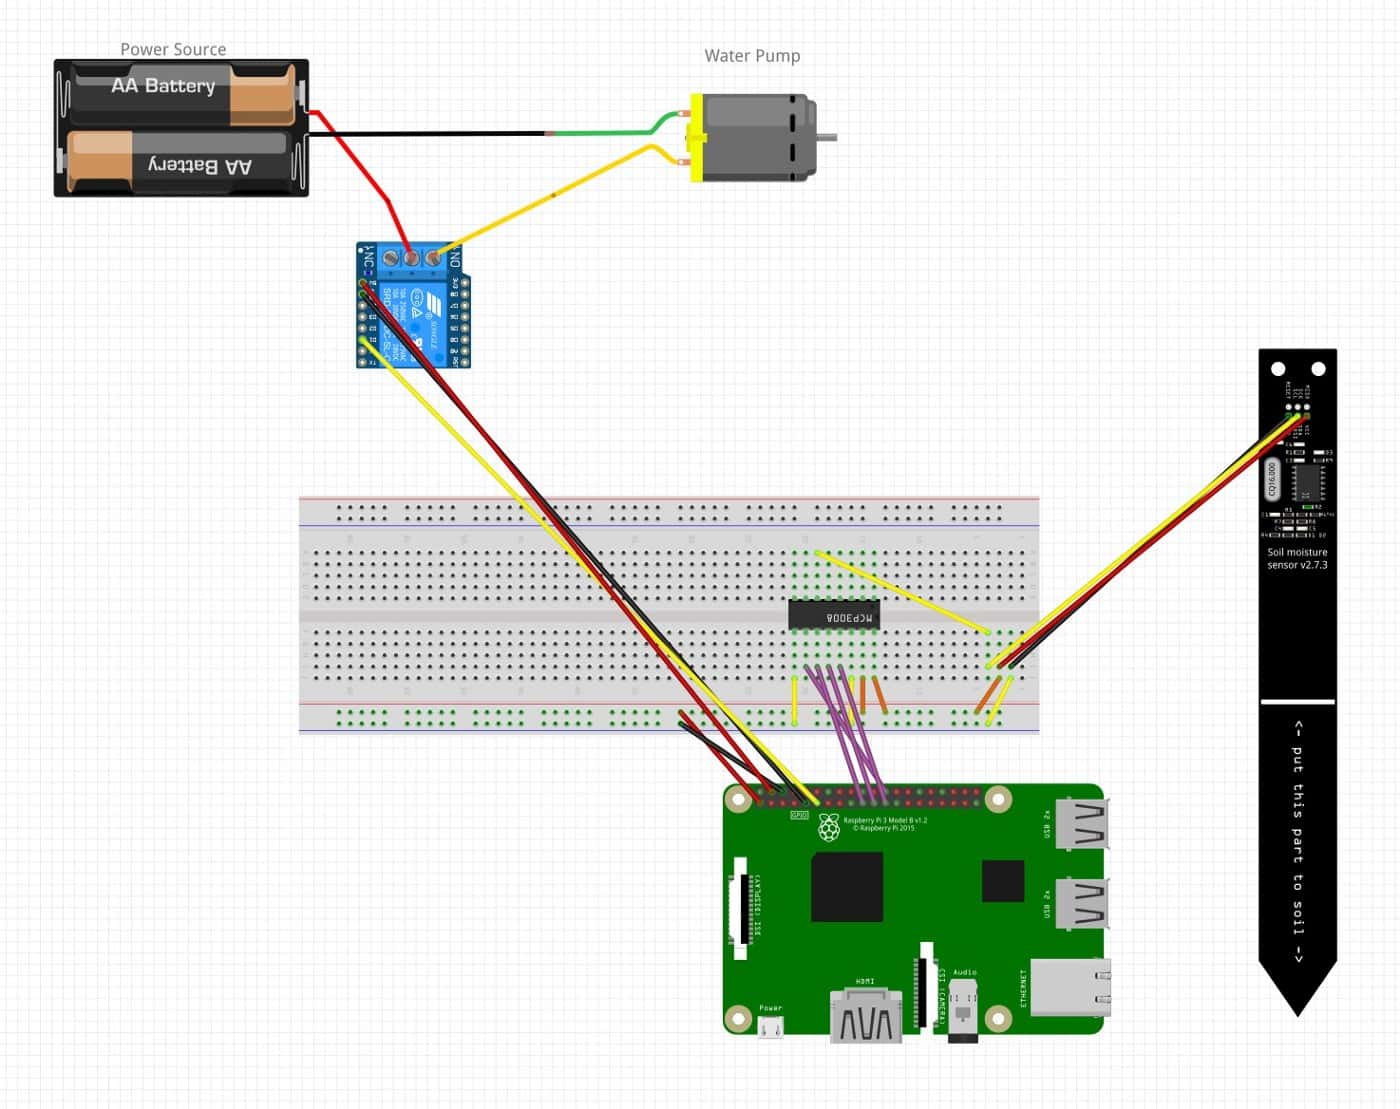
The following diagram shows how to connect each of the parts above to create the hardware configuration needed for the plant monitor.
Please excuse the battery and motor images; they should be generally a power source and the water pump (as noted in the diagram labels), but there were limitations in the software used to make the diagram.

Connect the Moisture Sensor to the Raspberry Pi
All of the GPIO (General Processing Input Output) pins on the Raspberry Pi are digital, so the Pi only supports digital inputs. This is because it doesn’t have a hardware analog to digital converter (ADC) on board. To use sensors that provide an analog signal for data readings, like some of the capacitive soil moisture sensors on the market, you have to also use an external ADC, like the MCP3008.
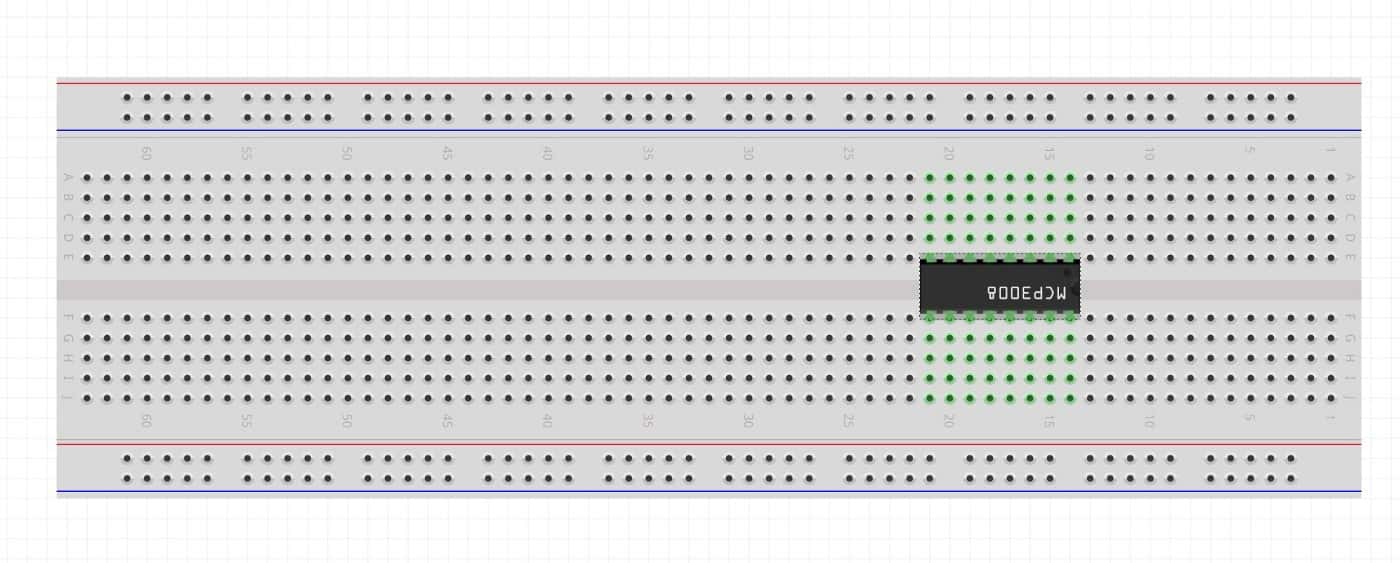
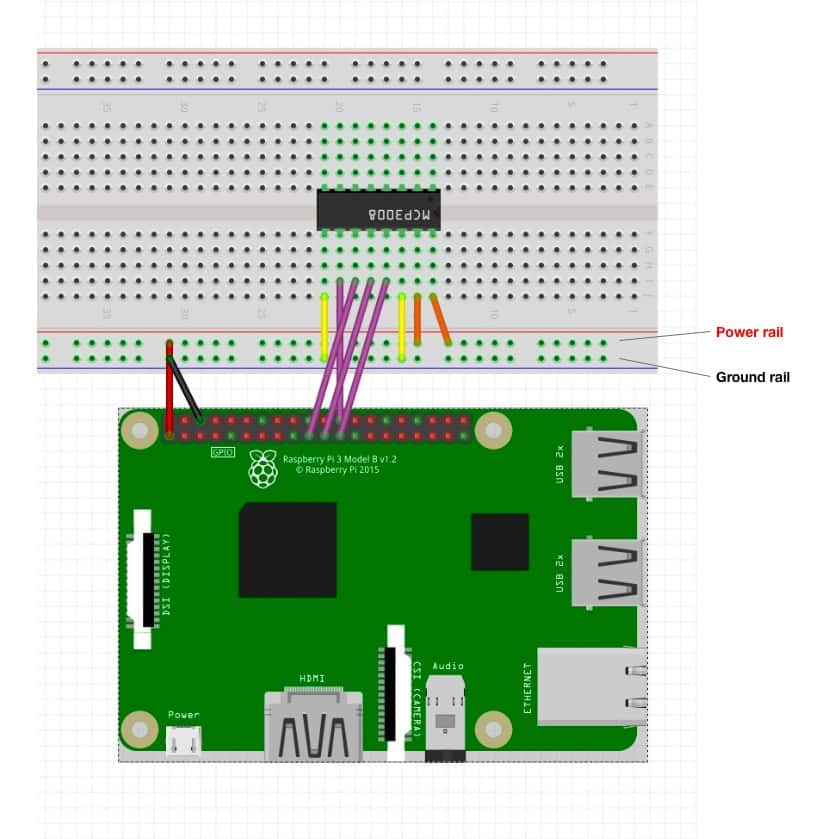
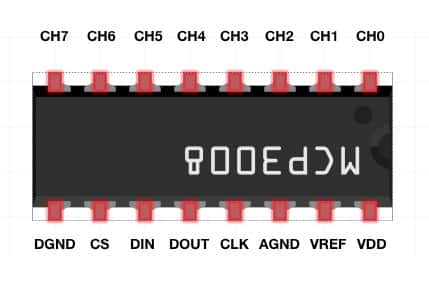
First, let’s place the MCP3008 on the breadboard. It should straddle the gap along the center of the breadboard with half of its pins on either side of the gap. The pin 1 indicator, which is a small circular indentation in one of the corners, should be positioned top right.

After placing the ADC on the breadboard, it’s time to connect the chip to ground, power, and to the Raspberry Pi’s SPI header pins. This is the step that requires the most wiring.
If you’re curious about SPI header pins, you can read more here: https://www.raspberrypi.org/documentation/hardware/raspberrypi/spi/README.md.
The connections should be configured as follows:
- Ground rail to DGND pin on MCP3008
- Ground rail to AGND pin on MCP3008
- Power rail to VREF pin on MCP3008
- Power rail to VDD pin on MCP3008
- Raspberry Pi SPI Header 26 pin to CS pin on MCP3008
- Raspberry Pi SPI Header 19 pin to DIN pin on MCP3008
- Raspberry Pi SPI Header 21 pin to DOUT pin on MCP3008
- Raspberry Pi SPI Header 23 pin to CLK pin on MCP3008
If you’re unfamiliar with the GPIO pins on the Raspberry Pi, there’s a handy reference on raspberrypi.org: https://www.raspberrypi.org/documentation/usage/gpio/.
The MCP3008 ADC is now connected to and powered by the Raspberry Pi.
Next, let’s connect the soil moisture sensor. The soil moisture sensor should be connected to the ground rail, the power rail, and one of the channel pins on the MCP3008 so that its value can be read by the ADC. The ADC will convert the analog signal from the sensor to a digital signal that will then be read by the Pi as an input. For this project, we’ll connect the soil moisture sensor to the CH5 pin on the MCP3008.
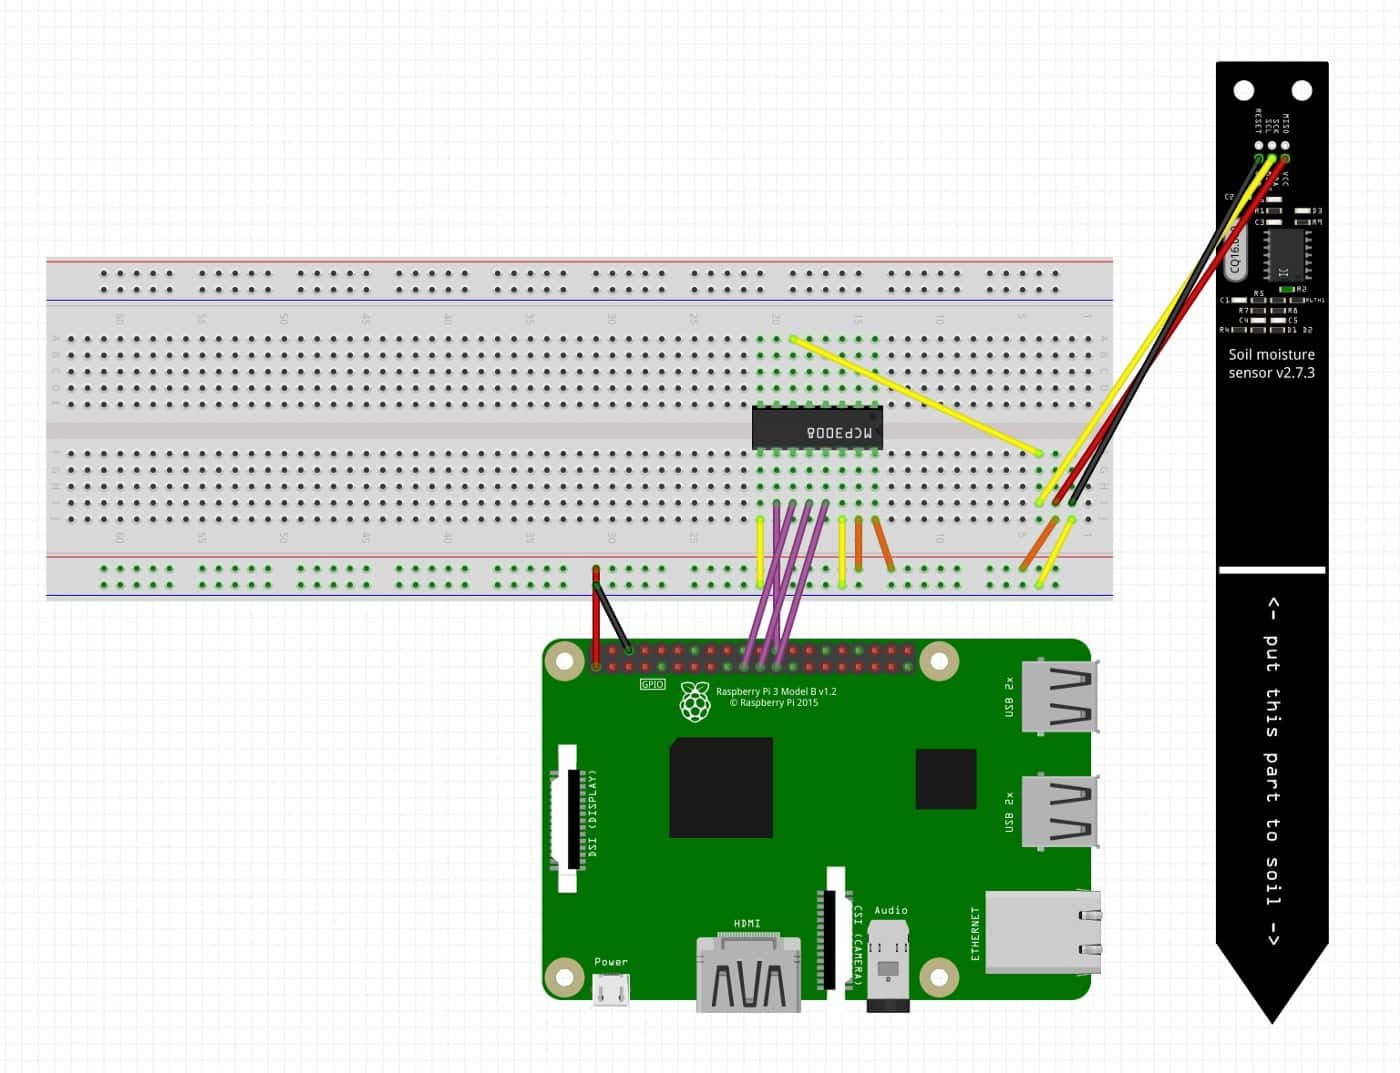
That’s it! You’ve now connected your soil moisture sensor to the Raspberry Pi via the MCP3008 ADC. Insert the soil moisture sensor into the soil.
Connect the Water Pump to the Raspberry Pi via Relay
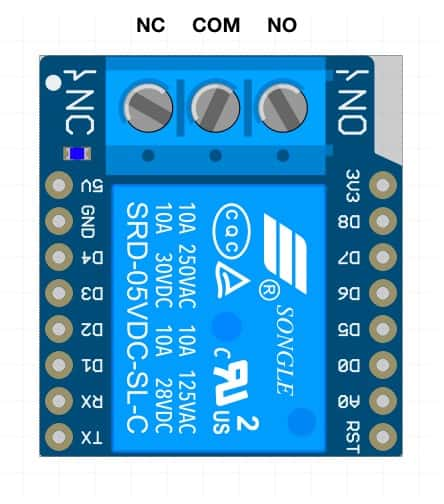
The relay allows us to open and close the circuit containing the water pump, so that we can easily start and stop watering the plant by cutting off power to the water pump.
First, connect the water pump to the 5V power supply. Then, connect the red wire from the water pump to the NO contact on the relay and the red wire from the power supply to the COM contact on the relay.
Always be careful when connecting power sources! If wired incorrectly, you could hurt yourself or fry your materials.
When the relay is on, the COM switch will close to complete the circuit. This means that power will flow to the water pump and the plant will be watered. The NO contact stands for “normally open,” which means that the circuit is open (i.e., incomplete) when the relay is off.
For more information about working with relays, checkout Gavin MacDonald’s video: https://www.youtube.com/watch?v=b6ZagKRnRdM.
After connecting the water pump to the relay, connect the relay to the Raspberry Pi using the following configuration:
- Connect the relay ground pin to Raspberry Pi ground pin 9
- Connect the relay 5V or VCC pin (depending on your relay) to the Raspberry Pi 5V pin, pin 4
- Connect one of the input pins, such as IN1 or D1 (depending on the relay) to the Raspberry Pi GPIO pin 17
That’s it for wiring up the project!
At this point, cut two pieces of the fish tank tubing: one short piece and a longer one. Connect the short piece to the end of the water pump that will pull the water into the pump. Connect the long piece to the end of the water pump that will pump water into the soil and then put the other end into the soil.
Now We’re Ready for Some Code!
At this point, our plant waterer is fully configured from a hardware standpoint. Now we need to write the code that will control it.
Enable SPI in the Raspberry Pi Config
To be able to access the data from the MCP3008 chip, you need to first enable SPI on your Raspberry Pi. To do that, follow these steps:
- On the command line, run
sudo raspi-config. - A gray menu should popup. On the menu, highlight the
Interfacing Optionsitem and then press the “Tab” key to highlight theSelectoption. Press “Enter.” - On the next menu, highlight the
SPIitem and then press the “Tab” key to highlight theSelectoption. Press “Enter.” - When asked if you want to enable SPI, press the “Tab” key to highlight the
Yesoption. Press “Enter.”
SPI is now enabled on your Raspberry Pi.
Download and Install NPM and Node.js
Node.js is a JavaScript runtime made to build scalable network applications. It’s JavaScript code that runs on the server. NPM is the Node Package Manager, which lets you download code modules written by other developers and made available for use through the open-source community. We’ll use Node.js and a few npm packages to create the plant watering script.
- Download npm and node to your Raspberry Pi. To do this,
run curl -sL https://deb.nodesource.com/setup_16.x | sudo -E bash -on the command line. At the time of writing, the latest version was for Node 16.x; check deb.nodesource.com to get the latest version and change thesetup_16.xpart of the URL in the command above. - Install npm and node by running
sudo apt-get install -y nodejson the command line. Make sure that the installation was successful by runningnode -von the command line. If a version is returned, then the install succeeded.
Configure Your Project
- Create a folder on your Raspberry Pi for this project and open the folder. From the command line, you can do this by running
mkdir plant-watererto make a folder called “plant-waterer” and then entercd plant-watererto open that folder. - Once you’re inside the folder, create a
package.jsonfile, which is a “manifest” that describes your project including the project’s name, author, version, any npm packages it uses, the versions for those packages, project configuration, and more. You can copy the code below and paste it into yourpackage.jsonfile:
1{ 2 "name": "plant-waterer", 3 "version": "0.0.1", 4 "private": true, 5 "scripts": { 6 "start": "node water-the-plant.js" 7 }, 8 "dependencies": { 9 "node-schedule": "^1.3.2", 10 "onoff": "^6.0.0", 11 "mcp-spi-adc": "^3.1.0" 12 } 13}
- On the command line, within the same folder as the
package.jsonfile, runnpm install. This will install all of the npm packages listed in thedependenciesobject. - You might have noticed that in the
package.jsonfile, there’s ascriptsobject that has astartproperty that seems to reference a file. Thescriptsobject contains scripts that you can run within your project using the formatnpm run [name of script], which would benpm run startin this case. This is how we will run our Node.js script. - Create the
water-plant-script.jsfile that’s referenced by the start script. It should be placed in the same folder as thepackage.jsonfile.
water-plant-script.js
This is where we’ll write the Node.js script that will check the moisture sensor and water the plant if needed. To start, let’s import the npm packages that we installed so that we can use them in our script.
1const mcpadc = require('mcp-spi-adc'); 2const Gpio = require('onoff').Gpio; 3const schedule = require('node-schedule');
Next, let’s create some constants that we’ll use to determine how wet or dry the plant’s soil is. The values below are calibrated to my soil moisture sensor; you will likely need to test yours with different moisture levels to determine the appropriate values for your project.
1const completelyWet = 395; 2const completelyDry = 780;
We also need to create a variable that we will use later to interact with the relay that’s connected to the water pump. The onoff npm package gives us access from Node.js to the GPIO pins on the Raspberry Pi. In our case, the relay is connected to the GPIO 17 pin on the Pi. The high value means that this is being used as an output pin with an initial level of 1.
1const pumpRelay = new Gpio(17, 'high'); 2// IMPORTANT: Use 'high' if relay uses low level trigger
We’ll need a function that can get the moisture level from the sensor. The function getMoistureLevel function uses the mcpadc npm package to get digital moisture sensor readings from the MCP3008 chip. It takes 50 sensor reading samples and averages them to provide the following data about the soil moisture:
- rawValue: The average raw sensor reading
- value: The average sensor reading
- soilDrynessPercentage: The average dryness of the soil as a percent
I used 50 samples for the readings to reduce inaccuracies in the values reported by my soil moisture sensor. You may want to try different values for this.
The getSensorReadings function attempts to read a value form the sensor and either returns the value or an error.
1function getSensorReadings(sensor) {
2 return new Promise((resolve, reject) => {
3 sensor.read((readError, reading) => {
4 if (readError) {
5 return reject(new Error(`There was an error getting the sensor reading: ${readError}`));
6 }
7 return resolve(reading);
8 });
9});};
10
11function getMoistureLevel() {
12 const readingPromises = [];
13 let readings = {};
14 readings.rawValues = [];
15 readings.values = [];
16
17 return new Promise((resolve, reject) => {
18 const sensor = mcpadc.open(5, {speedHz: 20000}, (error) => {
19 if (error) {
20 return reject(new Error(`There was an error accessing the sensor: ${error}`));
21 }
22 let iterator = 50; // Just need a large number of readings to try for better accuracy
23 while (iterator >= 0) {
24 readingPromises.push(getSensorReadings(sensor)
25 .then(reading => {
26 readings.rawValues.push(reading.rawValue);
27 readings.values.push(reading.value);
28 }).catch(error => {
29 return reject(error);
30 })
31 );
32 iterator--;
33 }
34
35 return Promise.all(readingPromises).then(() => {
36 const averageRawValue = readings.rawValues.reduce((a, b) => a + b, 0) / 50;
37 const averageValue = readings.values.reduce((a, b) => a + b, 0) / 50;
38 return resolve({
39 rawValue: averageRawValue,
40 value: averageValue,
41 soilDrynessPercentage: averageRawValue > 0 ? ((averageRawValue / completelyWet) * 100).toFixed(0) : 0,
42 });
43 });
44 });
45
46});};
We’ll also need a shouldWater function to determine whether we should water the plant or not based on the soil dryness. This will help us to not overwater the plant. For my sensor and plant, 45% seems like a reasonable point to water the plant. You may need to adjust this value.
1function shouldWater(moistureLevel) {
2 // Adjust value based on your sensor and needs of your plant
3 if (moistureLevel <= 45) {
4 return true;
5 }
6 return false;
7};
So far, we have functions to help us read data from the moisture sensor and use it to determine when to water the plant. Next, we need functions to do the watering. For this, we’ll create two functions: waterThePlant and stopWateringPlant.
The waterThePlant function “reads” the relay, meaning that it connects to it to get its status (i.e., is it on or off). It gets the moisture level from the moisture sensor and checks to see if the moisture level is in the range where the plant needs watering. If so and the relay is off, then the relay gets turned on, the water pump starts watering the plant, and a success status is returned.
The stopWateringPlant function also “reads” the relay. If the relay is on, then it gets turned off, the water pump stops watering the plant, and a success status is returned.
1function waterThePlant() {
2 return new Promise((resolve, reject) => {
3 pumpRelay.read(async (error, status) => {
4 if (error) {
5 return reject(new Error(`There was an error getting the pump relay status: ${error}`));
6 }
7 const moistureLevel = await getMoistureLevel();
8 const needsWater = shouldWater(moistureLevel.soilDrynessPercentage);
9 if (status !== 0 && needsWater) {
10 pumpRelay.writeSync(0);
11 // closes the circuit and starts the pump
12 }
13 return resolve({
14 status: `The plant is being watered.`,
15 });
16 });
17 });
18};
19
20function stopWateringPlant() {
21 return new Promise((resolve, reject) => {
22 pumpRelay.read((error, status) => {
23 if (error) {
24 return reject(new Error(`There was an error getting the pump relay status: ${error}`));
25 }
26 if (status !== 1) {
27 pumpRelay.writeSync(1);
28 // opens the circuit and stops the pump
29 }
30 return resolve({
31 status: `The plant is not being watered.`,
32 });
33 });
34 });
35};
Last, but not least, we need a shouldWaterPlant function that will run on a schedule to water the plants, calling each of the functions above as needed. This function uses the node-schedule npm package to create a cronjob-like scheduled Node job.
It’s scheduled to run every dat at 7 a.m. (0 7 * * *). When it runs, it uses a timeout to start watering the plant, water it for 3 seconds, and then stop watering it. Remember, the waterThePlant function has conditional checks in place to get the soil moisture level and then determines if the plant should be watered, so running this script daily shouldn’t water the plants if they don’t need it.
1const shouldWaterPlant = () => {
2 // Run every day at 7 a.m.
3 return schedule.scheduleJob('0 7 \_ \* \*', async () => {
4 // Water the plant for three seconds
5 setTimeout(() => {
6 waterThePlant();
7
8 setTimeout(() => {
9 stopWateringPlant();
10 }, 3000);
11 }, 3000);
12 });
13};
You can view the whole script on Github: https://gist.github.com/rdeprey/6395b808c9b72213d8a3f298a63efaca.
At this point, you can run npm run start in your project folder on your Raspberry Pi and it should run daily at 7 a.m, reading from your moisture sensor and watering your plant if the soil is dry. 🌱
To keep the watering script running after a reboot, use PM2 to automatically start it on boot. If you want to monitor soil moisture from multiple pots, you can also use MQTT to share sensor data among multiple devices. And if you're new to reading analog sensors on a Pi, see my post on using analog sensors with a Raspberry Pi.