Use MQTT to Share Sensor Data Among Multiple Devices
September 7, 2020 | 12 minutes
Over the past few years, I’ve accumulated a fair number of Raspberry Pis and have sensors set up to monitor various things around my home. As the number of sensors has grown, I’ve found myself wanting to create my own “home hub” similar to the Google Nest Hub or Amazon Echo, allowing me to see data from multiple devices at a glance.
I recently decided to do just that and initially thought that Bluetooth would be the easiest way to simultaneously get data from each device. After all, Bluetooth is a common way to connect commercially produced smart devices. While that is a valid option, I found it required a fair amount of setup though because you need to create custom GATT services for each device and the sensor data that you want to share from it.
As I was researching my options, I came across MQTT (short for Message Queuing Telemetry Transport), which is an OASIS standard messaging protocol for the Internet of Things (IoT). It’s a publish/subscribe (also known as pub/sub) messaging protocol that’s primary use is to connect remote devices. It has a small codebase, uses minimal network bandwidth, and is very lightweight. In order for MQTT to work, all of the devices have to be on the same network, but this wasn’t a problem given my device configuration.
In short, it was perfect for my needs! It might be a great fit for your next project too, so I wanted to share a guide on how to get started with using MQTT.
What You'll Need
Disclosure: I get commissions for purchases made through affiliate links in this post.
- Two or more devices on the same network — I use Raspberry Pis with sensors, but you can test on a single computer
- Node.js installed on each device
- (Optional) A breadboard and moisture sensors if you want to replicate my plant monitoring setup
This guide explains how to implement MQTT in JavaScript, but you can use the protocol in other languages as well. There’s a thorough list of MQTT implementations, tools, and resources available from hobbyquaker on Github that I recommend checking out for further information.
Basics of MQTT
Before we dive into writing code, let’s first discuss how MQTT works.
Key Features of MQTT
MQTT implements the following main tenets of the pub/sub model:
- Clients don’t need to know that other clients exist. To publish or subscribe to messages, clients only need to know the hostname/IP address and the port of the broker.
- It’s not time dependent. In most cases, MQTT is used to share messages in real-time, but it’s possible for the broker to store messages for clients that aren’t online.
- It works asynchronously, so it doesn’t block client-side rendering.
Publish/Subscribe Architecture
At its core, MQTT implements the publish/subscribe architecture to allow multiple devices to publish and subscribe to messages from other devices. It’s different from the client-server model that defines typical website interactions in that instead of clients communicating directly with an endpoint on a server, clients publish messages and other clients subscribe/receive those messages.
The publishers and subscribers never communicate with each other directly though. A client is never even aware that the other clients exist. Instead, there’s a component called a broker that sits between them and filters all incoming messages, making sure that they’re distributed correctly to subscribers.
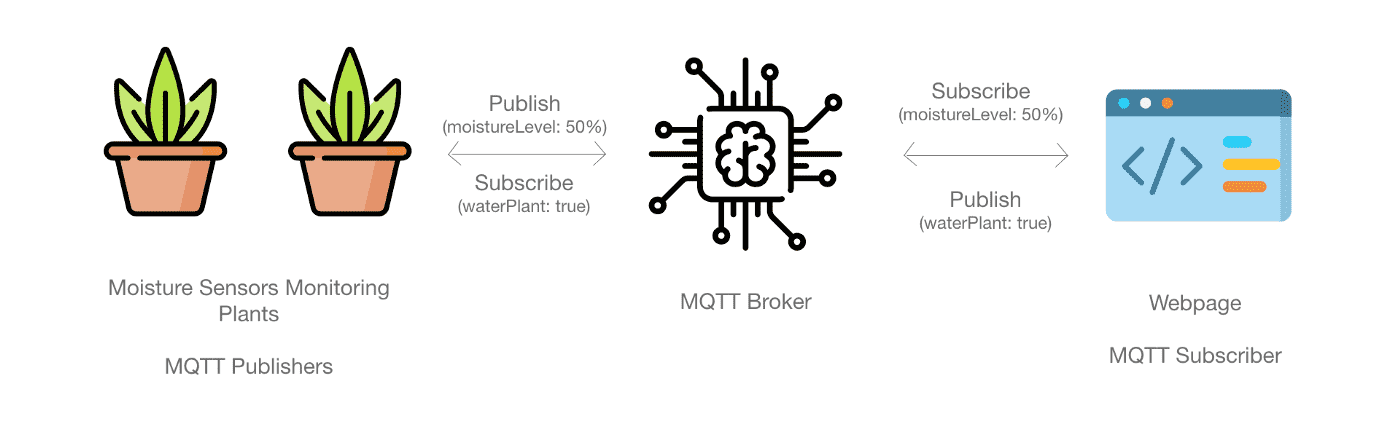
In the diagram above, the plant moisture sensors and the webpage are clients. Each client publishes data and subscribes to data, which is filtered by the broker and shared with the other clients who are subscribed. In this example, the website is used to render data from messages it subscribes to, but you could also have a backend API or database as a subscriber and persist message data as well.
The MQTT Broker: How Does it Filter Messages?
The MQTT broker is integral to the pub/sub architecture of the protocol. It ensures that subscribers only get the messages that they are interested in. It does this using one of the following filtering methods:
- Subject-based
- Content-based
- Type-based
Subject-based Filtering
With subject-based filtering, the broker filters messages based on their topic. The subscriber subscribes to the broker for messages on particular topics. Then, the broker makes sure to only forward messages on that topic to that subscriber. The topics are strings that can be filtered on with a limited number of expressions.
Content-based Filtering
With content-based filtering, the broker filters messages based on a specific content filter-language. This requires the content of the message to be known in advance though and can’t be easily changed or encrypted.
Type-based Filtering
Type-based filtering allows the broker to filter messages based on their type or class. This is common when using object-oriented languages.
For our starter setup, we’ll be using subject-based filtering to filter our messages.
How Does MQTT Work in the Browser?
To use MQTT in the browser, the broker needs to support MQTT over WebSockets and you need to use a JavaScript package like mqtt that supports MQTT clients over WebSockets.
What Are WebSockets?
WebSockets are a technology that enables bi-directional communication sessions between a client (such as a web browser) and a server. The connection between the client and server remains open until one of the two parties disconnects, which allows clients to receive messages from a server without needing to regularly poll the server for updates. When using MQTT over WebSockets, the server is the MQTT broker and the client is your web browser.
How Do You Connect to a WebSocket?
You connect to a WebSocket over the wss protocol instead of https. For example, if your MQTT broker is hosted at www.my-websocket.com/socket, you would connect to it over the URL wss://www.my-websocket.com/socket. Depending on the configuration of the WebSocket, you may also be able to use the insecure ws protocol.
Setting Up MQTT for Devices
For this guide, we’re going to get an MQTT broker running and create two MQTT clients: one that behaves as a publisher and one that behaves as a subscriber. In practice, the same client can do both though. We’ll run the broker and clients in three separate instances of Terminal/Command Prompt on a single computer. You can then use this setup as a starting point to implement MQTT in your own applications so that your microcontrollers can share data with each other.
Setting Up the MQTT Broker
There are a number of open source MQTT brokers, but Mosquitto is one of the most popular. To configure a Mosquitto MQTT broker on your computer, follow these steps:
Installing Mosquitto on Windows:
- Go to https://mosquitto.org/download/ and download the appropriate
.exefile for your computer. - Install the download by following the prompts.
Installing Mosquitto on Mac and Linux:
- Open your Terminal.
- If you don’t have Homebrew installed, follow the instructions on the Homebrew website to install it.
- After installing Homebrew, use it to install Mosquitto:
brew install mosquitto. (If Terminal gives you an error aboutbrewnot being a recognized command, then close Terminal, re-open it, and try the command again.) - When Homebrew is finished installing Mosquitto, you should see a message indicating that it’s been installed with a default configuration file.
Running Mosquitto
Mosquitto uses a configuration file to determine security settings, persistence settings, and more. For our starter project, we’ll use the default file, but you can learn more about the available settings through the Mosquitto website. The default file will be located in a different place depending on your operating system:
- Windows:
c:\mosquitto\mosquitto.conf - Mac:
/usr/local/etc/mosquitto/mosquitto.conf - Linux:
/etc/mosquitto/mosquitto.conf
To start Mosquitto with the default configuration, run the following command and substitute the location of the configuration file based on your operating system:
1mosquitto -c [configuration file location, such as /usr/local/etc/mosquitto/mosquitto.conf]
When Mosquitto runs, you should see something like this in your Terminal or Command Prompt:
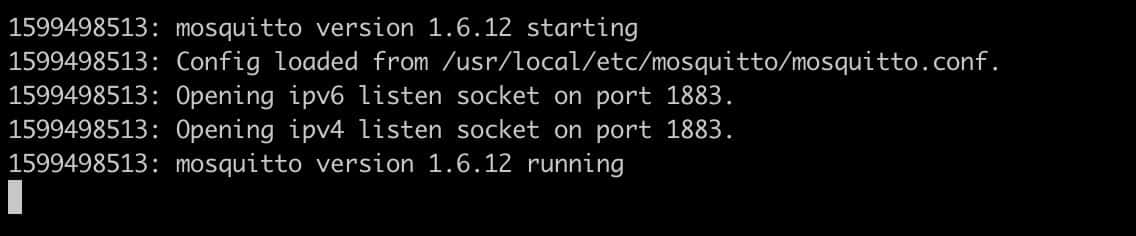
The third and fourth lines of the output show that there’s an IPv4 and IPv6 listen socket open on port 1883. We’ll need this information when we configure our clients, so keep it handy.
Leave this Terminal/Command Prompt window open because Mosquitto needs to be running in order for the clients to work.
Creating an MQTT Publisher Client
For the MQTT publisher client, return to your Terminal/Command Prompt and create a new sub-folder within mqtt-starter called publisher-client. Then, do the following in your new folder:
- Enter
npm initand follow the prompt to create apackage.jsonfile for your publisher client. You can set the values in this file to anything you want. The primary purpose for this step is to create apackage.jsonfile that can be used to manage the libraries installed for the project. - Enter
npm install --save mqttto install the MQTT library fromnpm.
Next, open your favorite code editor and create a new file in the publisher-client folder called index.js (this file name should match what’s in your package.json file as the “entry point”).
Then, in the index.js file, add the following code. The second line tells the client which broker to connect to. Use the port that you have Mosquitto running on after localhost:.
1const mqtt = require('mqtt'); 2const client = mqtt.connect('mqtt://localhost:1883');
Next, add a connection event handler that will run with the client connects to the broker. Our broker will filter messages using the subject-based filtering approach and for our example, we’ll use sensor as the topic. You can choose any string for your topic though.
1client.on('connect', function () {
2 client.publish('sensor', 'I am connected!');
3});
The code snippet above uses the client.publish function to publish the message “I am connected!” to the sensor topic when the client first connects to the broker.
That’s great and all, but it’s not very interesting is it? Let’s add something a little more dynamic to the mix so that we can see the client regularly publish updates. Add the following to your index.js file to publish a random number to the sensor topic every 15 seconds:
1setInterval(function() {
2 // published message must be a string
3 client.publish('sensor', Math.random().toString());
4}, 15000); // every 15 seconds
One thing to note is that the message you publish has to be a string. That’s why the random number generated by Math.random() in the example above is cast to a string.
To make our task easy to run, let’s add the following to the scripts section of our package.json file: "start": "node index.js". Then, run npm start in your Terminal/Command Prompt in the publisher-client directory to start your client. You won’t see anything happening in the console for the publisher client; you’ll see the output in the subscriber client console after the next set of steps.
Let’s now create an MQTT subscriber client that can subscribe to the sensor topic using our MQTT broker.
Creating an MQTT Subscriber Client
For the MQTT subscriber client, return to your Terminal/Command Prompt and create a new sub-folder within mqtt-starter called subscriber-client. Then, do the following in your new folder:
- Enter
npm initand follow the prompt to create apackage.jsonfile for your subscriber client, similar to the one you created for your publisher client. - Enter
npm install --save mqttto install the MQTT library fromnpm.
Next, open your favorite code editor and create a new file in the subscriber-client folder called index.js.
In the index.js file, add the following code. The second line tells the client which broker to connect to. Use the port that you have Mosquitto running on after localhost:. We’re connecting our subscriber client to the same broker that the publisher client is connected to.
1const mqtt = require('mqtt'); 2const client = mqtt.connect('mqtt://localhost:1883');
Next, add a connection event handler that will subscribe the client to a topic. Since our publisher client is publishing messages to the sensor topic, let’s subscribe to the sensor topic so that we can get the messages it sends. When the client subscribes, it will log a message to the console.
1client.on('connect', function () {
2 client.subscribe('sensor', function (err) {
3 if (!err) {
4 console.log('I am subscribed to the sensor topic!');
5 }
6 });
7});
Let’s also add a message event handler that will log the messages that our subscriber client receives on the sensor topic.
1client.on('message', function (topic, message) {
2 console.log(message.toString());
3});
Similar to the publisher client, let’s add the following to the scripts section of our package.json file for the subscriber client: "start": "node index.js". Then, run npm start in your Terminal/Command Prompt in the subscriber-client directory to start your client.
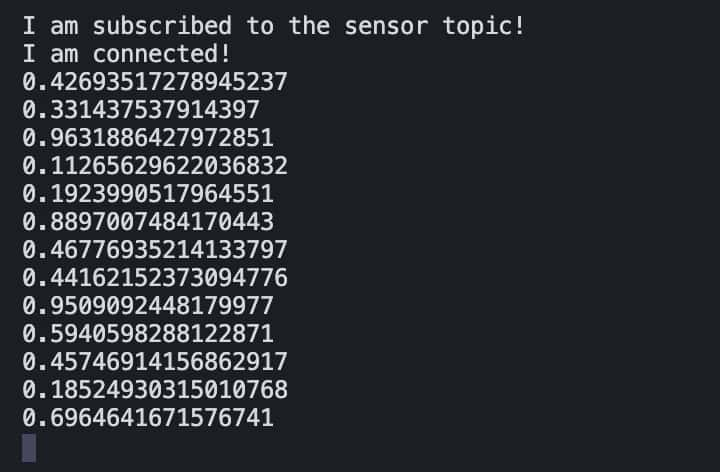
You should now have Mosquitto running in one Terminal/Command Prompt window, your publisher client in another, and your subscriber client in a third. If you wait 15 seconds, you should start to see random numbers printed to the console in the subscriber client window!
We now have a working MQTT configuration with a broker and two clients. You could extend this to more clients with many publishing messages to the sensor topic and many subscribing to receive those messages. You can also configure additional topics, add security so that only certain applications can subscribe or publish to a topic, and have different devices on the same network connected as clients to a single broker. It’s a pretty flexible way to share data among multiple devices.
Hopefully, this guide will help you start using MQTT in your projects! Here’s a full example of the publisher and subscriber clients in Github.
If you want your MQTT clients to keep running after a reboot, I recommend using PM2 to automatically start Node.js applications on boot. And if you’re new to working with Raspberry Pi sensors, check out my guide on using analog sensors with a Raspberry Pi.
Icon Credits The icons used in the diagram for this guide are from Flaticon: plant pot, chip free, and code.