Make a Meeting Indicator Screen with a Raspberry Pi
January 15, 2022 | 12 minutesIn This Post
With so many of us working from home, there's a new need to let others in our homes know when we're in meetings during the workday. To help with this around my home, I decided to make a simple "meeting indicator" device that shows when I'm busy/free during the workday by:
- Checking my Outlook calendar every 15 minutes to see if a meeting is happening
- Turning the LCD red if I'm in a meeting or green if I'm not
- Turning off the LCD screen outside of work hours
Here's how to make your own!
Parts
The meeting indicator is primarily a software project, but there are a few pieces of hardware that you'll need. Disclosure: I get commissions for purchases made through links in this post.
- Raspberry Pi Zero I used the Pi Zero for the small form factor. The project will work with any Raspberry Pi, but you'll probably need to make some changes to the code if you use a model other than the Zero. More on that below.
- An LCD screen similar to the Adafruit i2c RGB Positive 16x2 LCD screen
Raspberry Pi Zero and NodeJS Support
The Raspberry Pi Zero uses the ARMv6 instruction set architecture. NodeJS officially supported the ARMv6 architecture until version 12. From version 12 onward, the NodeJS team has offered unofficial releases for ARMv6, but they generally aren't as well tested as official releases.
I decided to write the code for this application using Node 11 to use an officially supported version. Node version 11 didn't support the newer ES Module syntax, so the code for the project uses CommonJS. If you decide to use an unofficial version, you may need to explicitly update the code to use CommonJS syntax or ES Module syntax.
Clone the Github Repo
The code from my project is available in a Github repo. You can use this as a starting point and modify it for your needs.
For the app to make requests to Microsoft's APIs, it needs a few environment variables. The environment variables are configured using dotenv and are listed in the dev.env file. dotenv will look for a .env file, so you should do the following to copy the dev.env file to a new .env file:
1cp dev.env .env
Now, you'll need to update the placeholders in the .env file with the actual values for your app. Set up your app in Azure Active Directory as outlined below to get the necessary environment variables.
Setting Up the App and Permissions in Azure Active Directory
You need to register your application in Azure Active Directory (AAD) to manage permissions for accessing your Outlook calendar. AAD will also provide the IDs and secrets that you'll need to get Microsoft authentication tokens to use when requesting calendar data through the Microsoft Graph Explorer API.
If you don't want to connect directly to your work account (and use their Azure Portal), you can import your work calendar into a separate account that you can use for the meeting indicator. Microsoft offers a FREE developer program that you can use for this project.
Registering Your App
To register your application in Azure, do the following:
- Go to the Azure Portal and sign in to your account.
- Search for Azure Active Directory in the services and click on it.
- In the left navigation, click on "App registrations."
- Create a new registration and complete the fields.
- For the supported account types, select "accounts in this organizational directory only" since you're only going to connect to your account.
- Leave the redirect URI field empty because we're building a console application and won't need this (it's for web apps).
After registering your app, you'll be able to get the tenant and client IDs for the app's .env file. Copy those values to the appropriate variables in the .env file.
Grant App Calendar Permissions
The app will need permissions to access your calendar.
- On your app detail page, click "API Permissions" in the left navigation.
- Add a permission and select Microsoft Graph.
- Select application permissions.
- Search and apply
Calendars.ReadandCalendars.ReadWrite. - Click the "Add permissions" button.
- Click the "Grant admin consent" button on the main screen to give the application consent.
Creating a Client Secret for Your App
To get the meetings from your calendar, you'll need a Microsoft authentication token to pass along with your API requests so that Microsoft can verify that the requests are coming from your authorized application. You need a client secret to send with the token request to get an authentication token.
- Click "Certificates & secrets" on your app detail page in the left navigation.
- Add a new client secret.
- Note: when the expiration date for the secret expires, your meeting indicator will stop working until you create a new secret and update the client secret value in the code. A shorter time period is more secure, though.
- After you've created the secret, copy the value (not the secret ID) for the new client secret and paste it into your
.envfile as theCLIENT_SECRETvalue.
Getting the Calendar ID
The last Azure Active Directory environment variable that you'll need to update is the OUTLOOK_CALENDAR_ID. This variable specifies which calendar you want the meeting indicator to check. To get the calendar ID:
- Log into the Microsoft Graph Explorer.
- Search for sample calendar queries.
- Run the "get all my calendars" request.
- Find the calendar you want to use and put its ID into the
.envfile as theOUTLOOK_CALENDAR_IDvalue.
Now that the configuration is out of the way let's move on to the more fun stuff!
Configuring the Hardware
Attach the LCD screen to the Raspberry Pi general-purpose input-output (GPIO) pins so that the female connections on the LCD screen fully line up with the male pins on the Raspberry Pi. That's all you need to do to configure the hardware.
The Code
Accessing the LCD Screen
The app uses the adafruit-i2c-LCD package to access the LCD screen.
My LCD screen runs on i2c bus one at the address 0x20. Yours might be at a different address. If the app can't access the LCD screen, use the i2c-tools package to find the address for your screen and update the line below accordingly.
1// Creates a reference to the LCD screen based on its i2c address 2const lcd = new LCDPLATE(1, 0x20)
Running sudo i2cdetect -y 1 to find the address for your LCD screen should show something like this:
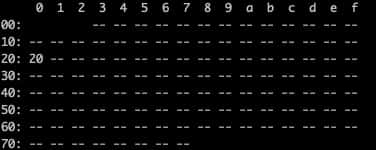
For more information on interacting with the LCD screen, check out the documentation for the adafruit-i2c-LCD package.
Turning Off the LCD Backlight on Weekends
Since Outlook provides the event dates and times in UTC, using UTC was the easiest way to handle setting dates and times for comparison purposes, so all dates and times in the app use UTC.
1// A date object representing the current date and time in UTC 2const currentDateTime = DateTime.utc()
The app uses the luxon package to work with date and time values more easily. It provides many helper functions for converting dates, formatting dates, and checking information about a date (like the day of the week). The weekday property below is from luxon and is used to turn off the backlight on the LCD screen on weekends.
1// Numeric value representing day of week; 6 is Saturday and 7 is Sunday 2const { weekday } = currentDateTime 3 4if (weekday === 6 || weekday === 7) { 5 turnOffScreen() 6 return 7}
Running the Application
The start function is the entry point to the meeting indicator app. It's called once to start the app.
The node-cron package calls the start function every 15 minutes after the initial running of the app to check for meetings and update the LCD screen at 15-minute intervals. Depending on your needs, you can change this value to check more or less often.
1cron.schedule('*/15 * * * *',, start) // runs once every 15 minutes 2start()
The start function does the following:
- Checks to see if the current time is outside work hours and turns off the screen if it is
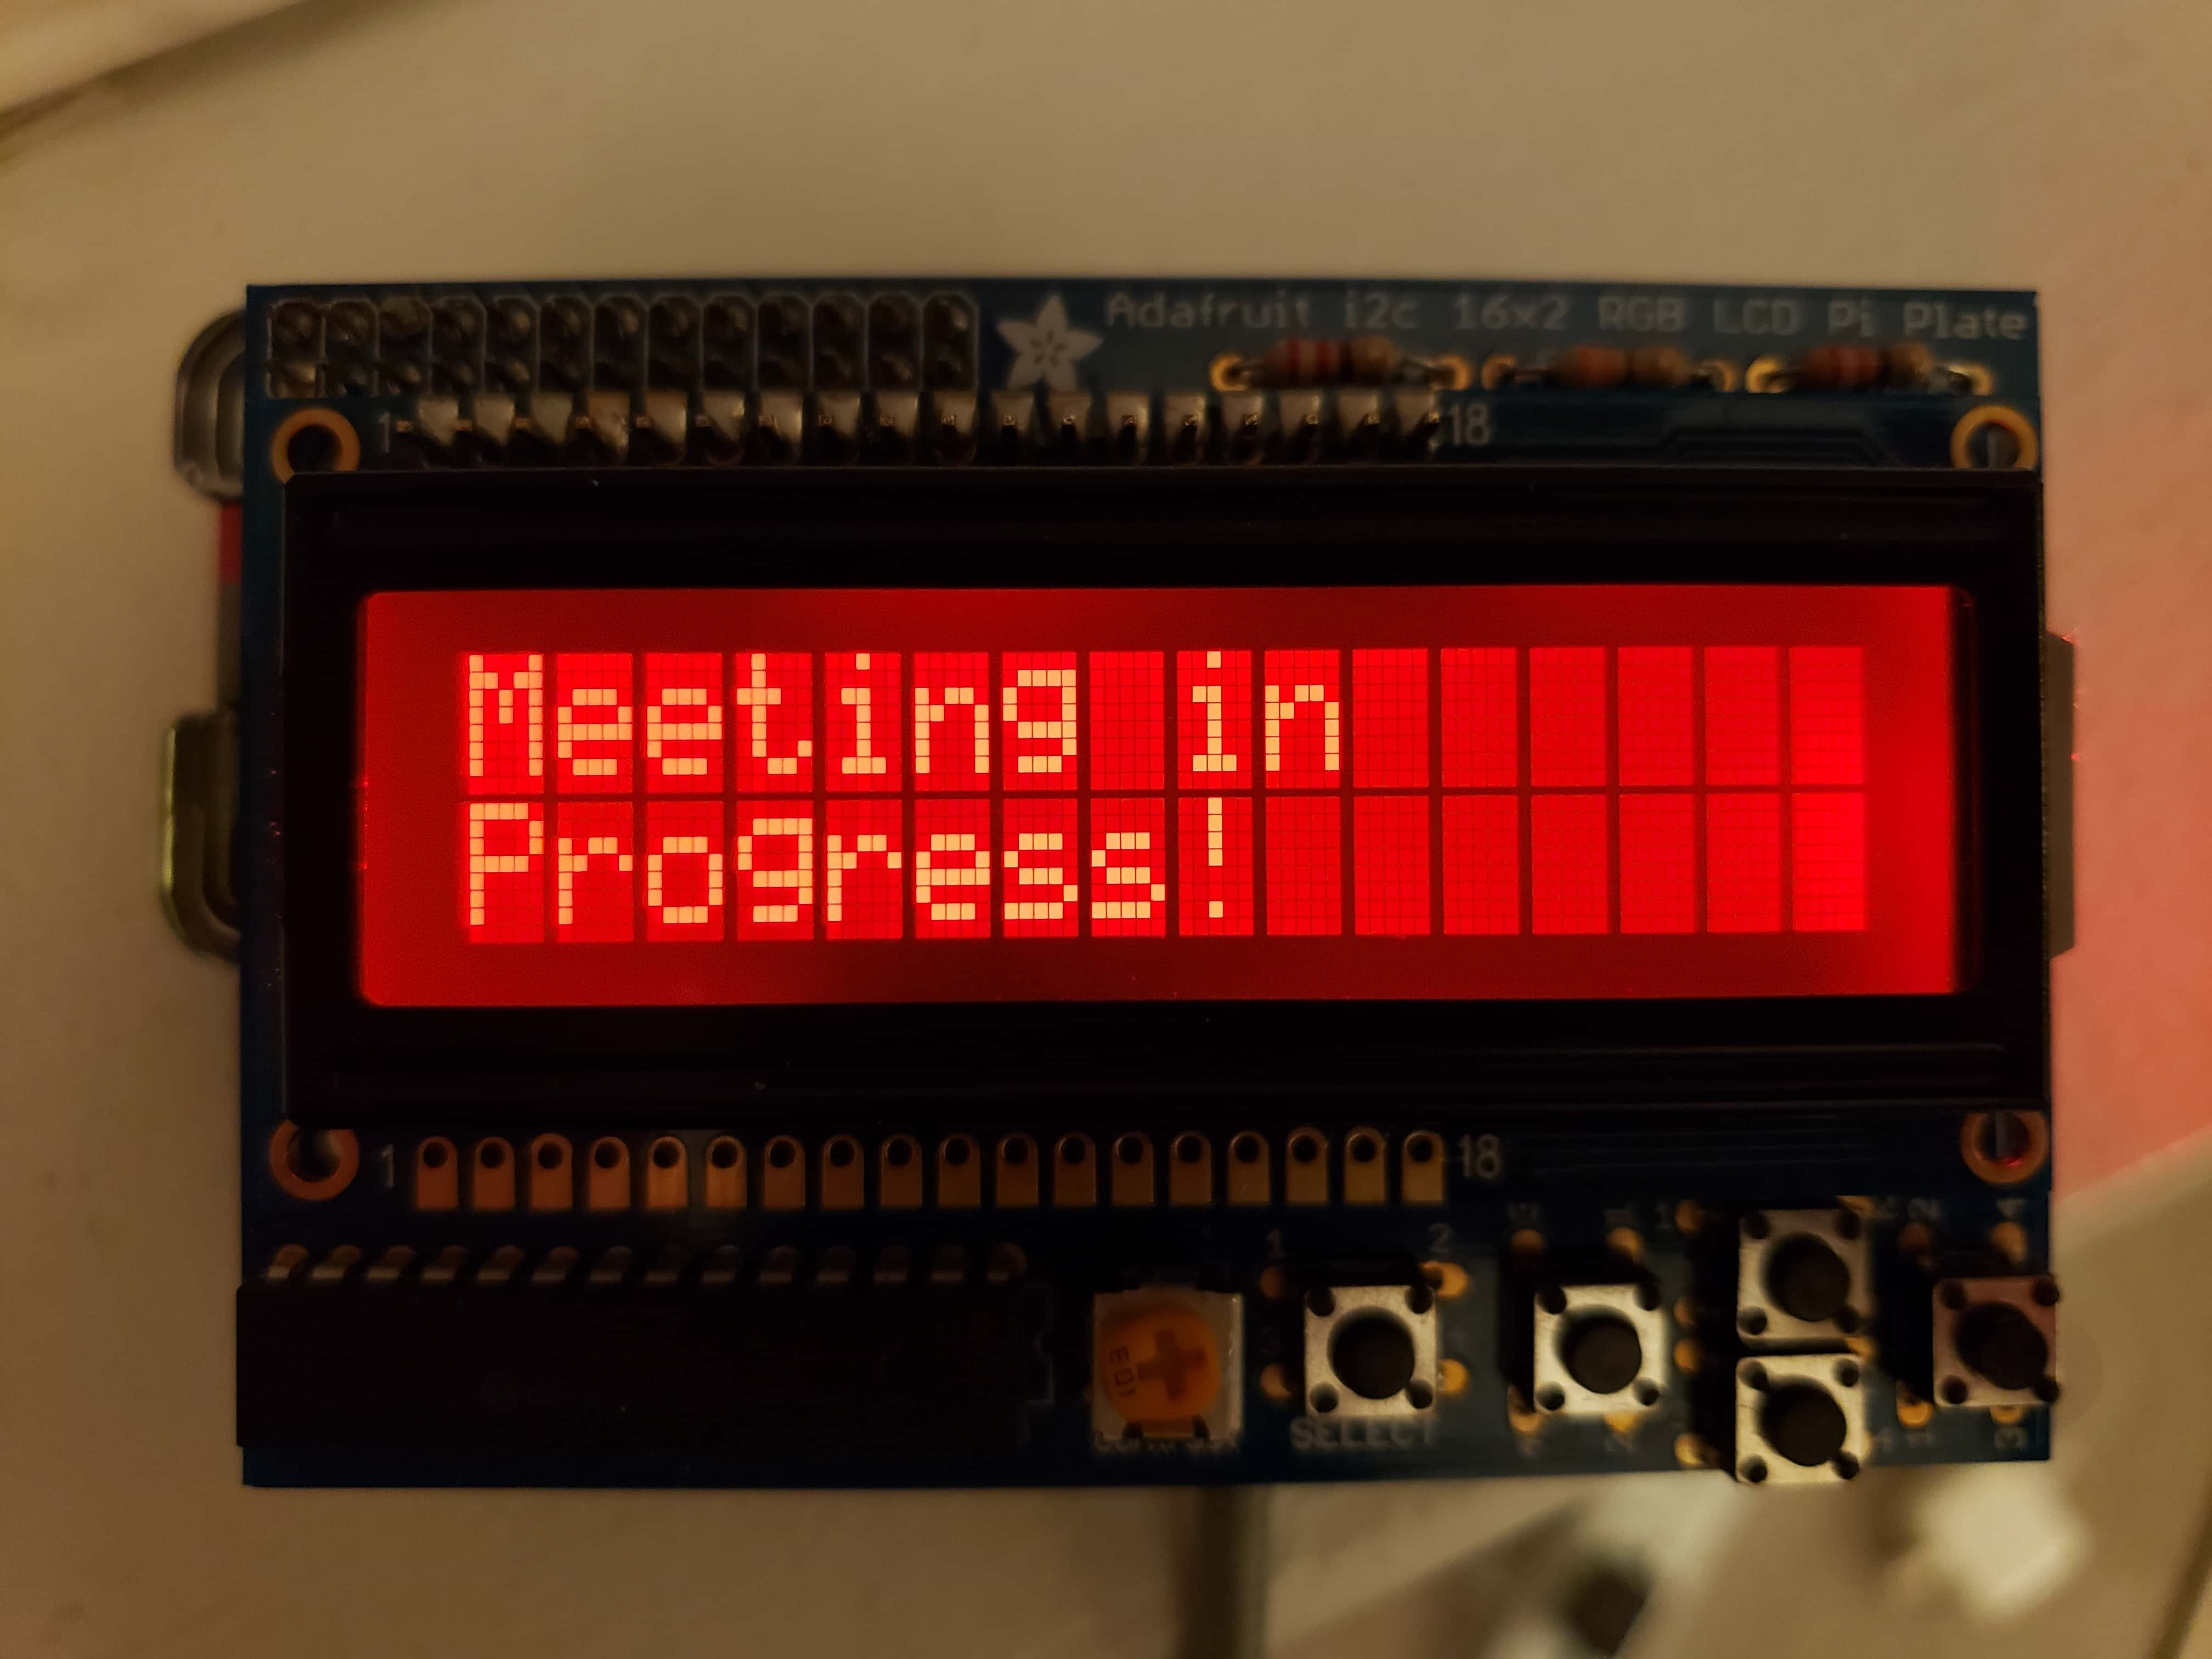
- Checks to see if an event is happening now
- Displays "Meeting in Progress!" message with a red backlight if there's an event happening now
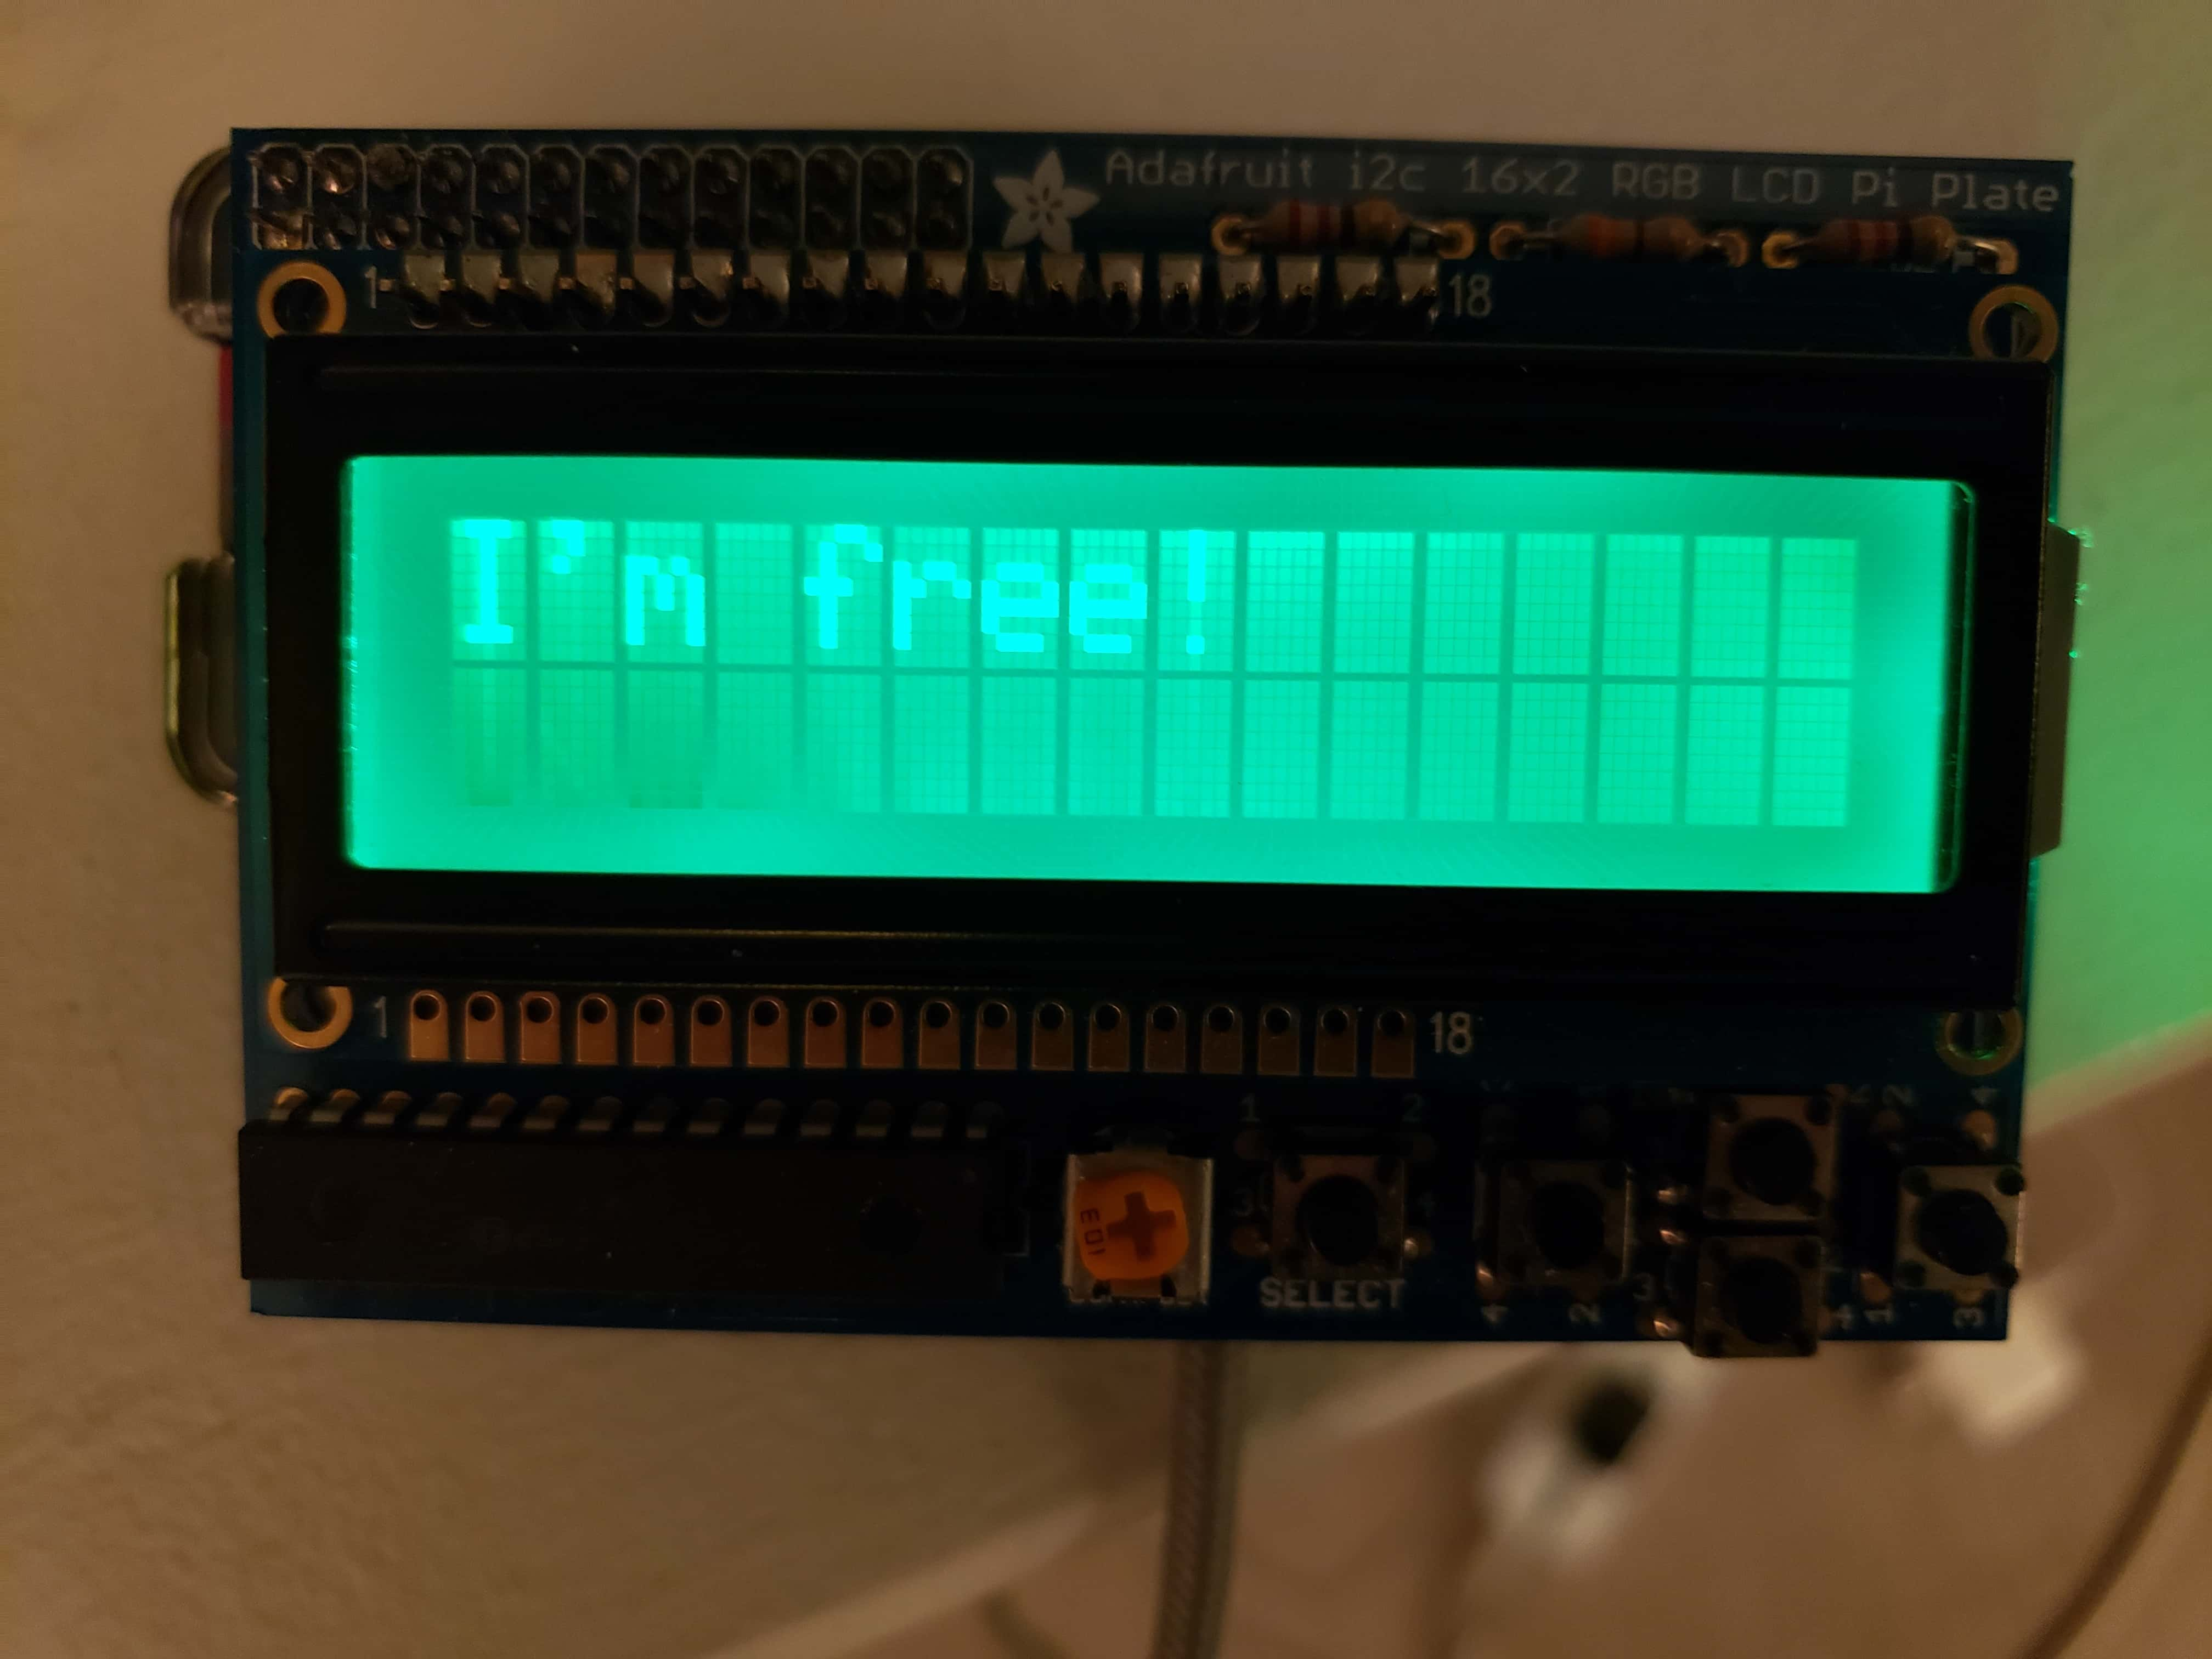
- Displays "I'm free!" message with a green backlight if there isn't an event happening now
It also catches errors. There are many ways to handle errors in an application. I'm using the Pushover service to send push notifications to my phone when errors occur in the app so that I'm aware of them. If you want to use Pushover, be sure to set the PUSHOVER_TOKEN and PUSHOVER_USER environment variables in the .env file based on your Pushover account setup. Otherwise, you can remove the Pushover fetch request from the catch block within the start function.
1const start = async () => {
2 try {
3 const currentDateTime = DateTime.utc()
4
5 // Numeric value representing day of week; 6 is Saturday and 7 is Sunday
6 const { weekday } = currentDateTime
7
8 if (weekday === 6 || weekday === 7) {
9 turnOffScreen()
10 return
11 }
12
13 // A date string representing the work start time (9 am) for the current date in UTC
14 const workStart = DateTime.utc(
15 currentDateTime.year,
16 currentDateTime.month,
17 currentDateTime.day,
18 14,
19 0,
20 0
21 ).toString()
22
23 // A date string representing the work end time (5 pm) for the current date in UTC
24 const workEnd = DateTime.utc(
25 currentDateTime.year,
26 currentDateTime.month,
27 currentDateTime.day,
28 22,
29 0,
30 0
31 ).toString()
32
33 // Turn off the screen outside of work hours
34 if (
35 Date.parse(workStart) > Date.parse(currentDateTime.toString()) ||
36 Date.parse(currentDateTime.toString()) > Date.parse(workEnd)
37 ) {
38 turnOffScreen()
39 return
40 }
41
42 const meetings = await fetchMeetings()
43
44 const isHappeningNow = isMeetingHappeningNow(meetings)
45
46 // Clear the previous message from the screen
47 lcd.clear()
48
49 // If there's a meeting happening, show a message and make the screen red
50 if (isHappeningNow) {
51 lcd.backlight(lcd.colors.RED)
52 lcd.message('Meeting in\nProgress!')
53 } else {
54 // If there isn't a meeting happening, show a message and make the screen green
55 lcd.backlight(lcd.colors.GREEN)
56 lcd.message("I'm free!")
57 }
58 } catch (error) {
59 console.log(error)
60 await fetch(
61 `https://api.pushover.net/1/messages.json?
62 title=Meeting+Indicator+Error
63 &message=${error.message}&token=${process.env.PUSHOVER_TOKEN}
64 &user=${process.env.PUSHOVER_USER}`,
65 { method: 'POST' }
66 )
67 }
68}
69
70cron.schedule('*/15 * * * *', start) // runs once every 15 minutes
71start()
Getting the Meetings
Before getting the meetings from Outlook using the Microsoft Graph Explorer API, we need to get an authentication token to send user data and meeting requests. The app uses the @azure/msal-node package to authenticate with Microsoft.
The authentication flow is configured as follows:
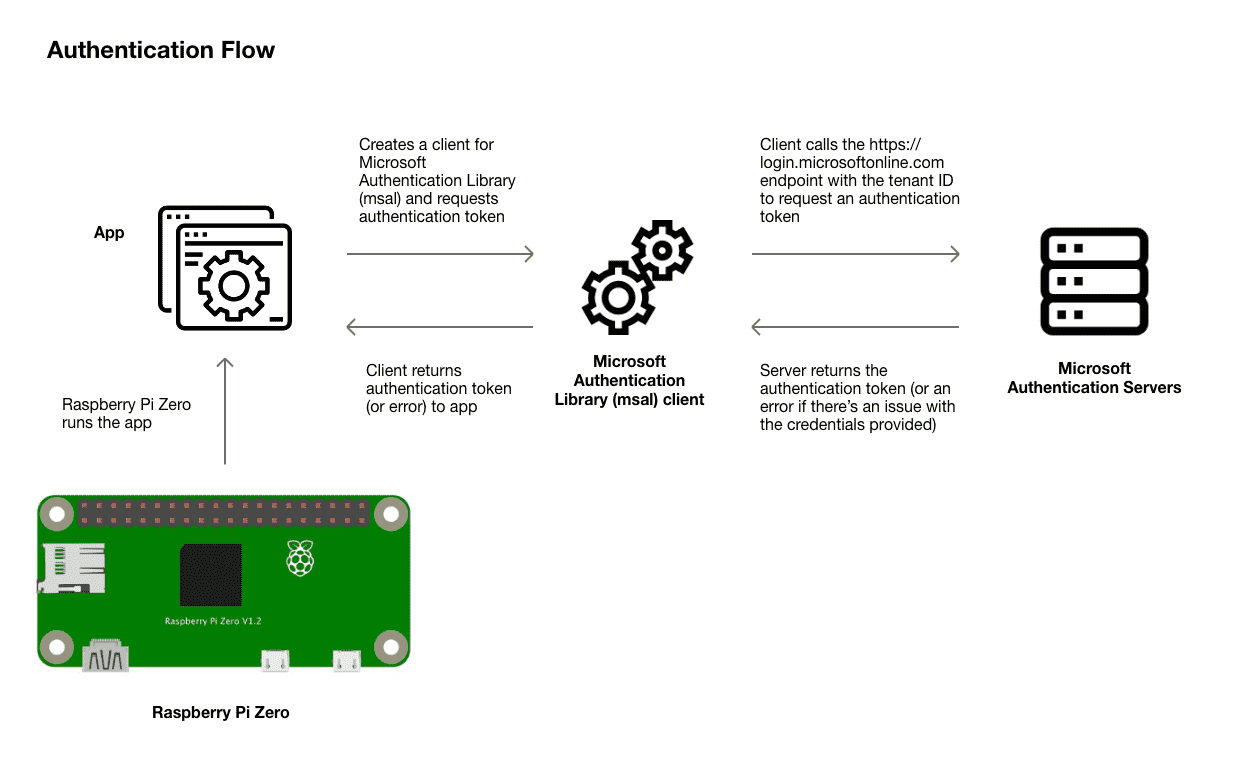
The authentication code is in the auth.js file (including the getToken function below), copied from Microsoft's example Node console app with minor modifications.
1// Gets the Microsoft Graph Explorer API auth token 2const getAuthToken = async () => { 3 const authResponse = await getToken(tokenRequest) 4 return authResponse.accessToken 5}
After getting the access token, we get the current date and time. We also calculate the date and time 30 minutes in the future. These will be used as query parameters in the API request to provide the timeframe we want to use to retrieve meetings.
1const currentDateTime = DateTime.utc().toString()
2const thirtyMinutesFromNow = DateTime.utc().plus({ minutes: 30 }).toString()
We still need to provide one more piece of data that we don't have yet: a user ID. The user ID identifies whose calendar to search for meetings. We need to call the Graph Explorer API users endpoint to get the user ID.
When requesting the user data, the authentication token must be included as a bearer token in the Authorization request headers. The apiOptions parameter in the function below contains the correct headers.
1// Get's my user ID from Microsoft Graph Explorer API 2const getUserId = async (apiOptions) => { 3 const userRes = await fetch(apiConfig.uri, apiOptions) 4 const { value } = await userRes.json() 5 return value[0].id 6}
Here’s a sample request and response:
1// Request: 2// https://graph.microsoft.com/v1.0/users/USER_ID/ 3// calendars/CALENDAR_ID/calendarview? 4// startdatetime=2022-01-14T14:00:00.0000000 5// &enddatetime=2022-01-14T15:30:00.0000000 6 7// Sample Response: 8{ 9"@odata.context": 10"<https://graph.microsoft.com/v1.0/$metadata#users('USER_ID') 11/calendars('CALENDAR_ID')/calendarView>", 12"value": [ 13 { 14 "@odata.etag": "", 15 "id": "EVENT_ID", 16 "createdDateTime": "2022-01-04T01:46:27.7022336Z", 17 "lastModifiedDateTime": "2022-01-10T18:15:46.6799499Z", 18 "changeKey": "", 19 "categories": [], 20 "transactionId": null, 21 "originalStartTimeZone": "Eastern Standard Time", 22 "originalEndTimeZone": "Eastern Standard Time", 23 "iCalUId": "", 24 "reminderMinutesBeforeStart": 15, 25 "isReminderOn": false, 26 "hasAttachments": false, 27 "subject": "Busy", 28 "bodyPreview": "", 29 "importance": "normal", 30 "sensitivity": "normal", 31 "isAllDay": false, 32 "isCancelled": false, 33 "isOrganizer": true, 34 "responseRequested": true, 35 "seriesMasterId": null, 36 "showAs": "busy", 37 "type": "singleInstance", 38 "webLink": LINK TO OUTLOOK EVENT, 39 "onlineMeetingUrl": null, 40 "isOnlineMeeting": false, 41 "onlineMeetingProvider": "unknown", 42 "allowNewTimeProposals": true, 43 "isDraft": false, 44 "hideAttendees": false, 45 "recurrence": null, 46 "onlineMeeting": null, 47 "responseStatus": { 48 "response": "organizer", 49 "time": "0001-01-01T00:00:00Z" 50 }, 51 "body": { 52 "contentType": "html", 53 "content": "<html><head><meta http-equiv=\\"Content-Type\\" content=\\"text/html; charset=utf-8\\"><meta name=\\"Generator\\" content=\\"Microsoft Exchange Server\\"><!-- converted from rtf --><style><!-- .EmailQuote { margin-left: 1pt; padding-left: 4pt; border-left: #800000 2px solid; } --></style></head><body><font face=\\"Times New Roman\\" size=\\"3\\"><span style=\\"font-size:12pt;\\"><a name=\\"BM_BEGIN\\"></a></span></font></body></html>" 54 }, 55 "start": { 56 "dateTime": "2022-01-14T14:00:00.0000000", 57 "timeZone": "UTC" 58 }, 59 "end": { 60 "dateTime": "2022-01-14T17:00:00.0000000", 61 "timeZone": "UTC" 62 }, 63 "location": { 64 "displayName": "", 65 "locationType": "default", 66 "uniqueIdType": "unknown", 67 "address": {}, 68 "coordinates": {} 69 }, 70 "locations": [], 71 "attendees": [], 72 "organizer": { 73 "emailAddress": { 74 "name": YOUR_NAME, 75 "address": EMAIL_ADDRESS 76 }}} 77 ] 78}
Once we have the access token, start and end dates, and a user ID, we can send a request to the Graph Explorer API to get the Outlook meetings.
1// Gets the calendar events from Outlook using the Microsoft Graph Explorer API
2const fetchMeetings = async () => {
3 const accessToken = await getAuthToken()
4 const currentDateTime = DateTime.utc().toString()
5 const thirtyMinutesFromNow = DateTime.utc().plus({ minutes: 30 }).toString()
6
7 const options = {
8 headers: {
9 Authorization: `Bearer ${accessToken}`
10 }
11 }
12
13 const userId = await getUserId(options)
14
15 // The OUTLOOK_CALENDAR_ID specifies which of your calendars
16 // to get meetings from
17 const endpointWithQueryParams = `https://graph.microsoft.com/
18 v1.0/users/${userId}/calendars/${process.env.OUTLOOK_CALENDAR_ID}
19 /calendarview?startdatetime=${currentDateTime}
20 &enddatetime=${thirtyMinutesFromNow}`
21
22 const meetingRes = await fetch(endpointWithQueryParams, options)
23 const { value: meetings } = await meetingRes.json()
24
25 return meetings
26}
You should now have a working meeting indicator!
Troubleshooting Tips
If the current date or time used in the script seems incorrect, verify that the time is set correctly on the Raspberry Pi. You can check this by running the timedatectl command. You can also use timedatectl to intentionally change the time on the Pi to test aspects of the app.
Automatically Run the Meeting Indicator When Starting the Raspberry Pi
You can use pm2 to run the application whenever your Raspberry Pi starts. For information on configuring pm2 on your Pi, check out my blog post about automatically starting NodeJs applications.
Icon Credits
The icons used in the authentication diagram are from Flaticon: application, automated-process, and server.